Thursday, January 20, 2011

Mini-Pumpkin Ginger with Cream Cheese Frosting

Photobucket

Toward the end of October, I made mini-pumpkin cupcakes with cream cheese frosting for our church’s Thanksgiving Service.

I used the same pumpkin-ginger recipe that I used for my spider-web cupcakes

However, I wanted the pumpkin flavor to be bolder, so I used about two cups of canned pumpkin instead of one.

For the frosting, I used my new Wilton frosting pump that my mom gave me:

Photobucket

It works wonderfully!

Photobucket

My family and my cousin Elizabeth were fans of the cupcakes, and I heard a few comments at church that they were good.

(I think I wrote down somewhere what people actually said, but I don’t know where. That’s what happens when you put-off posting; you forget what happened.)

My personal assessment is that they were quite flavorful and had a nice not-too-sweet composition. :)

Wednesday, January 19, 2011

Cake Pops! Red Velvet

Photobucket Photobucket

For my friend Hilary's bridal shower, I decided to make and bring cake pops! I had never made cake pops before, and so this was a risk. I won’t lie, the process involved much frustration and snafoos. My mom was my devoted assistant, for I desperately needed one.

It's a pretty in-depth process and the instructions are long. I used one of the cake pop recipes at Bakerella.com. (She has such adorable cake pop and baking ideas!)

Here are those directions with several of my comments/changes intermixed:

My comments= italicized

Notice: Because I hate it when I start making something and didn’t realize that a few steps down it says to chill something for a long time…

FOR BEST RESULTS: Your cake balls should be put in the freezer either overnight or for several hours.

My cake pops were red velvet cake with white candy melt.

Ingredients:
1 box cake mix (cook as directed on box for 13 X 9 cake)
1 can frosting (16 oz.)
  • I used cream cheese frosting, almost the whole can. It probably could have worked with the entire can
Wax paper
Candy melts (1 lb. pkg.)
  • You can find candy melts at JoAnne's, Michaels, and probably other craft stores. The common brand is "Wilton" and they come in 14 oz bags. I found some at Target, but a different brand and they only had white. The craft stores should have multiple colors. I ended up needing two 14 oz. bags.
Lollipop sticks
  • Found at Michaels and, I'm sure, other craft stores as well
  • You will also need a block of Styrofoam (not too firm) or floral foam (to dry the cake pops on).

After cake is cooked and cooled completely, crumble into large bowl.

  • I used a spatula and scooped the cake into a bowl, then crushed into small chunks about the size of dimes and smaller.
Mix thoroughly with 1 can frosting.
  • I scooped the frosting in the bowl and worked it in with my fingers. This is suggested by the recipe on the site, but is very messy. The spatula just wasn't doing the job for me.
Roll mixture into quarter size balls and place on wax paper covered cookie sheet.

  • My balls were bigger than quarter sized and so we only got about 30 balls instead of 45-50 like the recipe says. It all depends on your choice for the ball to stick-length ratio.
Photobucket

  • Here is where I would change the recipe. The recipe says to melt the candy melts next, but I would put a different step first:
Dip the tip of your lollipop stick in the frosting and insert that end into the cake balls. Insert a little less than halfway.
  • The frosting creates a cement for the stick in the ball.
Place the cake balls with sticks in the freezer to firm up.
  • Initially, I put them in the freezer for 15 minutes. But this was not long enough and the balls fell off the sticks when dipping. I tried about 15 minutes more and they worked better but still with some mess-ups. I finished the project in the morning having froze the remaining balls overnight. This resulted in zero issues with the cake slipping off the stick. If you have the time to freeze them, I would recommend it. But you may just have to do some trial-runs with extra cake pops to see what works for you.
Photobucket

Once the cake balls are firm....

Melt candy melts in the microwave per directions on package. (30 sec intervals, stirring in between.)

  • The directions may say to melt the candy melts in the bag, but you should melt them in the bowl that you want to use for dipping the cake balls in. We used a bowl that was deep enough to half-way submerge the cake ball, but shallow enough to spin the cake ball around. I'll explain this later. You should try to make sure that the melted candy melt consistency is pretty watery. About a minute and a half to two minutes in the microwave worked for me. If it's too thick, it will be too heavy on the cake ball.
Once firm, carefully insert the cake ball into the candy coating by holding the lollipop stick and rotating until covered. Once covered remove and softly tap and rotate until the excess melted candy falls off. Don’t tap too hard or the cake ball will fall off, too.

  • I rolled the cake ball by slowly spinning the stick around the circumference of the bowl. Depending on the depth of the candy melt, you may have to tilt the bowl to get the candy melts to cover the underside of the ball.
  • It is difficult to get the candy melt on the balls to be smooth, but the wetter the candy melt and the more you spin the excess off, the more smooth the will be. But that all depends on what you want the look of them to be. Smooth vs. imperfect.
Push the sticks down in a styrofoam block to dry.
  • We used floral foam because the styrofoam we tried to use was too firm to stick the sticks into easily.
The candy melts dry quickly.
  • For my presentation I cut floral foam to fit inside decorative boxes and covered the foam with tin foil. We placed the foam in the boxes and stuck the cake pops in it. We tied ribbon bows on each pop. There are several ways to display cake pops, and you can look some images up on the Internet to find them.
Photobucket

I know this is in-depth, but it’s definitely worth it because they are just delicious!

Photobucket

It was very encouraging the night of the shower because I got a lot of positive feedback. Several people were raving about them and wanted to keep eating more. This is the response I want for anything I make :)

Monday, November 22, 2010

October Monster Cupcakes

Photobucket


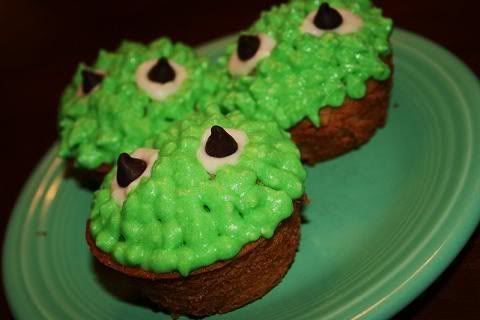
On October 23rd, I made some monster cupcakes inspired by Taste of Home Magazine's monster cupcakes.


I didn't use the article while I made my cupcakes, but I remembered the general idea of piping the frosting to look like fur.
I used Elinor Klivan's recipe called "Kid-Simple Cupcakes."


THE RECIPE:

Cupcakes
1 ¼ cups unbleached all-purpose flour
½ tsp. baking powder
½ tsp. baking soda
¼ tsp. salt
1 large egg
1 large egg yolk
1 cup sugar
½ cup canola oil or corn oil
1 tsp. vanilla extract
½ cup sour cream

Frosting
1/2 cup (1 stick) unsalted butter, room temperature
3 cups powdered sugar
1 tsp. vanilla extract
3 to 4 tbsp. whole milk

Make the Cupcakes
Pre-heat oven to 350 degrees. Sift all the dry ingredients together and set aside.

In a large bowl, using an electric mixer on medium speed, beat the egg, egg yolk, and sugar until thickened and lightened, about 2 minutes.

Stop the mixer and scrape the sides of the bowl as needed during mizing. On low speed, mix in the oil and vanilla. Mix in the sour cream until no white streaks remain. Mix in the flour mixture until the batter is smooth.

Fill each paper liner with a scant ¼ cup of batter, to about ½ inch below the top of the liner. Bake just until the top feels firm and a toothpick inserted in the center comes out clean, about 23 minutes. Cool the cupcakes for 10 minutes in the pan on a wire rack. Remove the cupcakes from the pan onto a wire rack and let cool completely.

(I usually try to remove the cupcakes after a few minutes and cool on a wire rack, for fear of them over-cooking in the hot pan.)

Make the Frosting:

In a large bowl, using an electric mixer on low speed, beat the butter, powdered sugar, and vanilla together with 3 tablespoons milk. Add up to 1 tablespoon more milk if needed to form a creamy, spreadable frosting.

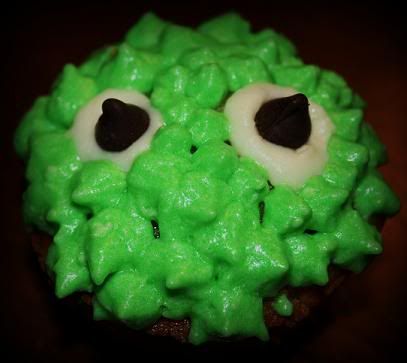
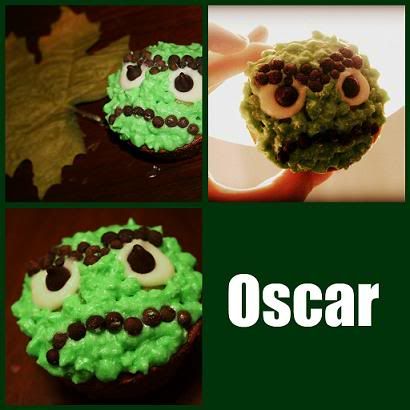
I set aside a small cup of the white icing and then made the rest green.
I added almost an entire tube of green food dye. Getting a deep green took a while.

(I didn’t decorate as suggested in the recipe.)

Photobucket


I used a spatula to make small white circles on each cake and placed chocolate chips for the eyeballs. I used a piping bag full of the green frosting and made small ball-shape squirts for the fur look.


THE FINAL PRODUCT:

Photobucket


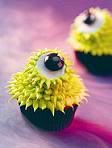
My sister and I made an Oscar the Grouch cupcake using Allspice peppers. (No one actually ate the peppers, it was just for fun.)

Photobucket


My opinions:
I think the cupcakes turned out quite cute. Some of the cakes looked a bit sloppy with the fur design (the balls blended into each other and looked bumpy rather than furry.) This was probably because the frosting was melting because the cakes were too hot. The cupcakes tasted good. They were fluffy and tasty, but very sweet. I would have preferred the frosting be more creamy than just soft and sugary.

COMMENTS AND CONCERNS:

Unfortunately, there was a mis-hap with one of the cupcakes. As my sister Amelia was eating one, she made a distressed exclamation. "Can you tell me why I have this THING in my cupcake?" She held a chunk of black plastic in her hand. I could hardly believe my eyes, but after investigating the KitchenAid, I saw what had happened. A knob above the bowl had broken in two. The other half must have fallen into my batter and remained there. How I never saw the chunk as it was stirring, and how I didn't notice it as I poured the batter into the liners, I have no idea. Nonetheless, Amelia claims she was traumatized.

My family agreed that the monsters looked cute and that the cakes tasted good.
My boyfriend enjoyed them as well. So did Ruth, who added that she especially thought the chocolate chips complimented the flavors well and that she would like even more on the cupcake next time I make these.